

How to Refinish a Wooden Coffee Table? Quick Answer and Overview
Refinishing a wooden coffee table involves sanding away the old finish, repairing damage, applying stain or paint, and sealing with a protective topcoat. This DIY project typically takes 2–4 weeks (including drying time) and costs $50–$150 in materials. The process restores worn surfaces, removes stains and scratches, and extends your furniture’s lifespan. You’ll need sandpaper (various grits), wood stain or paint, polyurethane or varnish, brushes, and safety equipment. Whether your table has water rings, fading, or peeling finish, refinishing brings it back to life while saving money compared to replacement.

A wooden coffee table is a centerpiece in most living rooms. Over time, daily use leaves marks, spills cause stains, and sunlight fades the finish. Rather than buying new furniture, refinishing offers an affordable, sustainable solution. The process is straightforward for beginners, though patience and attention to detail matter. In July 2026, refinishing trends emphasize eco-friendly stains and water-based polyurethane finishes. This guide walks you through every step, from prep to final seal.
Key Takeaway: Refinishing a wooden coffee table is an achievable DIY project that restores beauty and function without professional costs.
What Materials and Tools Do You Need for Refinishing?
Before starting, gather all necessary supplies. Having everything on hand prevents interruptions and ensures a smooth workflow. Quality materials make a visible difference in the final result. Most items are available at hardware stores or online retailers.
- Sandpaper: 80-grit, 120-grit, and 220-grit for progressive smoothing.
- Wood stain or paint in your chosen color and finish type.
- Polyurethane or varnish (water-based or oil-based) for protection.
- Brushes or foam applicators for smooth, even application.
- Tack cloth to remove dust between sanding stages.
- Drop cloth or plastic sheeting to protect floors and surroundings.
- Safety gear: dust mask, safety glasses, and gloves.
- Wood filler for repairing gouges or deep scratches.
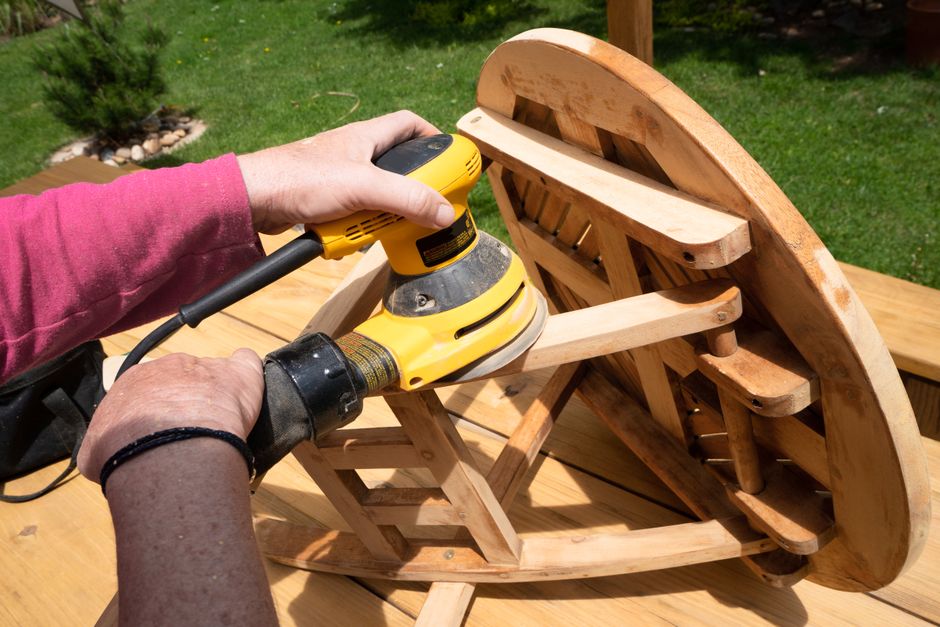
- Orbital sander (optional but recommended for large surfaces).
Wood stain choices range from water-based to oil-based formulas. Water-based stains dry faster and emit fewer fumes, making them ideal for indoor projects. Oil-based stains penetrate deeper and offer richer color but require longer drying times. For a natural look, consider transparent stains that highlight wood grain. Opaque finishes like paint work for modern or farmhouse styles.
Polyurethane comes in matte, satin, and gloss sheens. Water-based polyurethane is eco-friendly and dries quickly, while oil-based versions provide durability and amber warmth. Apply multiple thin coats rather than one thick coat to avoid bubbles and drips. Most projects require two to three coats for adequate protection.
Key Takeaway: Invest in quality sandpaper, stain, and polyurethane; proper tools and materials determine your refinishing success.
How Do You Prepare Your Coffee Table for Refinishing?
Preparation is the foundation of a professional-looking finish. Rushing this stage leads to uneven results and wasted materials. A well-prepped surface accepts stain evenly and bonds securely with topcoats. Plan to spend one to two days on thorough prep work.
Assess Current Damage and Condition
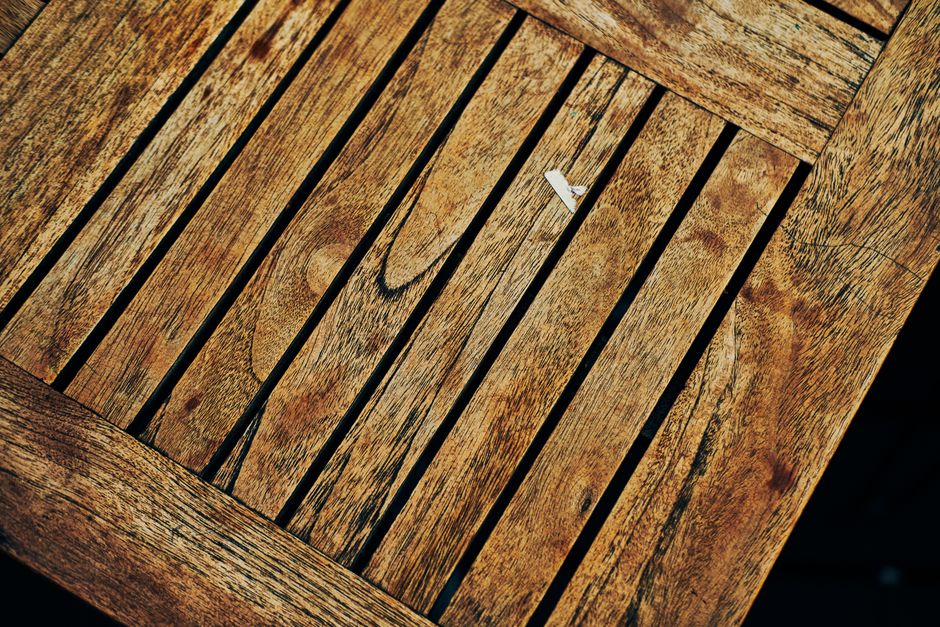
Examine your table closely under bright light. Look for water stains, scratches, dents, loose joints, and peeling finish. Minor surface damage disappears during sanding, but structural issues need repair first. Check that legs are stable and joints are tight before proceeding.
Water rings and white marks respond well to sanding and refinishing. Deep gouges require wood filler before sanding. If legs wobble, tighten screws or dowels. Loose joints may need regluing with wood glue. Address these problems now to avoid redoing work later.
Strip or Sand the Old Finish
For heavily painted or varnished surfaces, chemical strippers save time. Apply stripper per manufacturer instructions, let it sit, then scrape away loosened finish. Wear gloves and ensure good ventilation. Alternatively, sanding removes finish gradually but generates dust. Use a dust mask and work in a well-ventilated space.
Start with 80-grit sandpaper to remove the bulk of old finish. Sand with the wood grain using circular motions. Progress to 120-grit, then 220-grit for a smooth final surface. Between grits, wipe the table with a tack cloth to remove dust. This prevents scratches from grit particles dragging across wood.
- 80-grit removes old finish and levels the surface quickly.
- 120-grit smooths rough spots and prepares for staining.
- 220-grit creates a silky surface ready for topcoats.
- Tack cloth eliminates dust between each sanding stage.
Repair Damage and Fill Gaps
Once sanded, apply wood filler to dents, gouges, or cracks. Choose filler that matches your wood type or stain color. Press filler firmly into voids using a putty knife. Overfill slightly, then sand smooth after drying. Most fillers dry within 30 minutes to one hour.
For gaps between boards or around the edge, use paintable caulk designed for wood. Smooth with a wet finger or caulk tool. Allow full curing before sanding lightly. Proper filling prevents stain from settling into voids and creating dark spots.
Key Takeaway: Thorough prep—sanding, stripping, and filling—ensures even stain application and professional results.
What Is the Best Technique for Staining Your Coffee Table?
Staining brings color and character to bare wood. The technique matters as much as the product choice. Uneven application shows as blotchy patches, while proper technique yields uniform, beautiful results. Allow adequate drying time between coats.

Choose Your Stain Type and Color
Test stain colors on scrap wood or an inconspicuous area first. Stain appearance varies with wood species and grain. Light woods like pine and birch accept stain differently than dense woods like oak or walnut. Sample multiple colors to find your preference. In 2026, trending colors include warm grays, honey tones, and deep espresso finishes.
Water-based stains dry in 1–4 hours, allowing faster project completion. Oil-based stains require 8–24 hours drying and offer deeper, richer hues. Gel stains provide thicker consistency, reducing drips and uneven coverage. They work well for vertical surfaces or beginners.
Apply Stain Evenly
Stir stain thoroughly before use. Shake gel stains gently to avoid bubbles. Apply with a brush, foam applicator, or cloth in long strokes following the wood grain. Work in sections, maintaining a wet edge to prevent lap marks. Overlap slightly between sections for seamless blending.
For first-time refinishers, foam applicators offer better control than brushes. Dampen the applicator slightly before dipping in stain. Apply thin, even coats. Thick stain pools in corners and edges, creating dark spots. Wipe excess from edges with a clean cloth after 5–10 minutes.
- Stir stain thoroughly to ensure even color distribution.
- Apply thin coats following the wood grain direction.
- Maintain a wet edge to avoid lap marks and streaks.
- Wipe excess stain from edges and corners promptly.
- Allow full drying time before applying additional coats.
Build Color with Multiple Coats
One coat of stain may not achieve your desired color depth. Apply a second or third coat if needed, allowing full drying between applications. Each coat deepens the hue. Test on scrap wood to predict final color.
Between coats, lightly sand with 220-grit paper to smooth any raised grain. Wipe with a tack cloth to remove dust. This ensures the next coat adheres properly and maintains smoothness. Patience at this stage prevents sanding and restaining later.
Key Takeaway: Apply thin, even stain coats with the grain; test colors first and allow full drying between applications.
How Do You Apply a Protective Topcoat Finish?
The topcoat protects your refinished table from spills, heat, and daily wear. Polyurethane and varnish are the most popular choices. They add durability while enhancing wood appearance. Multiple thin coats outperform one thick coat.
Choose Between Water-Based and Oil-Based Finishes
Water-based polyurethane dries in 2–4 hours, allowing faster project completion. It emits low odor and cleans up with water. Colors remain true without yellowing. However, it’s slightly less durable than oil-based options and may require more coats. Ideal for eco-conscious refinishers and indoor spaces.
Oil-based polyurethane provides superior durability and amber warmth. It dries in 8–24 hours and requires mineral spirits for cleanup. Over time, it may yellow slightly, enhancing vintage aesthetics. The stronger odor demands excellent ventilation. Choose oil-based for high-traffic tables or desired warmth.
- Water-based: fast drying, low odor, no yellowing, eco-friendly.
- Oil-based: superior durability, warm tone, requires ventilation.
- Apply 2–3 coats for adequate protection and smoothness.
- Sand lightly between coats with 220-grit paper.
Apply Polyurethane Correctly
Stir polyurethane gently to avoid bubbles. Never shake the can. Apply with a high-quality brush or foam applicator in thin, even strokes. Work with the grain and maintain a wet edge. Avoid overworking the finish, which introduces bubbles and streaks.
Apply the first coat and allow full drying per product instructions. Sand lightly with 220-grit paper to scuff the surface, improving adhesion for the next coat. Wipe away all dust with a tack cloth. Apply the second coat using the same technique. A third coat adds extra protection for high-use tables.
Cure and Protect During Drying
Polyurethane continues hardening for days after application. Keep the table undisturbed in a clean, dust-free environment. Avoid placing items on the surface for at least 24 hours. Full cure takes 3–7 days depending on product type and humidity.
During curing, protect the table from dust, pets, and moisture. Cover with a clean cloth if necessary. Open windows for ventilation but avoid drafts that carry dust. Once fully cured, your table is ready for normal use and will resist stains and spills effectively.
Key Takeaway: Apply 2–3 thin polyurethane coats, sand between applications, and allow full curing before using your table.
What Are Practical Tips for a Professional-Looking Finish?
Several techniques separate amateur results from professional-quality refinishing. These tips address common mistakes and enhance your final outcome. Implementation requires minimal extra effort but yields noticeable improvements.
- Work in optimal conditions: Refinish at 60–75°F with 40–60% humidity. Extreme temperatures and humidity slow drying and cause finish issues.
- Use quality tools: Invest in good brushes or foam applicators. Cheap brushes shed bristles and create streaks. Natural bristle brushes work best with oil-based products; synthetic bristles suit water-based finishes.
- Maintain consistent technique: Apply all coats using identical brush strokes and pressure. Inconsistency creates visible differences in sheen and color.
- Sand between every coat: Light sanding with 220-grit paper improves adhesion and smoothness. Skip this step and you risk peeling or rough texture.
- Tack cloth is essential: Dust particles under topcoat create bumps and imperfections. Tack cloth removes 99% of dust, ensuring smooth results.
- Ventilate properly: Open windows and use fans to circulate air. Fumes from oil-based products are harmful; good ventilation protects your health.
- Test on scrap wood: Always test stain and finish on matching wood before committing to your table. This prevents expensive mistakes.
- Allow full curing: Resist using your table until polyurethane fully hardens. Premature use creates soft spots and damage.
Troubleshooting Common Issues
Brush marks appear when applying thick coats or overworking the finish. Prevent this by using thin coats and light brush strokes. If marks occur, sand them out with 220-grit paper and apply another thin coat. Bubbles form from shaking polyurethane or applying too thickly. Stir gently and apply thin, even coats to avoid this.
Blotchy stain results from uneven sanding or wood grain variation. Pre-stain conditioner, applied before staining, prevents blotches on softwoods like pine. Allow the conditioner to dry fully before staining. Peeling finish indicates poor prep or incompatible products. Ensure you sand thoroughly and use compatible stain and topcoat brands.
If your table has pet damage or you’re concerned about future protection, consider reading our guide on how to protect furniture from pet hair and stains in 2026. This complements refinishing by establishing maintenance routines.
Key Takeaway: Work in proper conditions, use quality tools, sand between coats, and troubleshoot issues promptly for professional results.
Frequently Asked Questions
How long does it take to refinish a wooden coffee table?
Refinishing takes 2–4 weeks total, including drying time. Active work spans 3–5 days: prep (1–2 days), staining (1 day), and topcoat application (1–2 days). Most time involves waiting for materials to dry between stages. Oil-based products require longer drying than water-based alternatives, extending the timeline.
Can I refinish a coffee table without sanding?
Sanding is essential for removing old finish and preparing the surface. Skipping it results in stain rejection and poor adhesion. However, you can minimize sanding by using chemical strippers to remove most old finish first, then light-sanding to smooth the surface. This approach reduces dust and labor while maintaining quality results.
What’s the difference between stain and paint for coffee tables?
Stain penetrates wood, highlighting grain and natural beauty. Paint sits on the surface, covering grain and wood character. Stain offers transparent, natural finishes; paint provides solid colors and modern aesthetics. Stain requires fewer coats; paint typically needs two coats. Choose stain for traditional styles and paint for farmhouse or contemporary designs.
Is water-based polyurethane as durable as oil-based?
Water-based polyurethane is nearly as durable as oil-based when applied in multiple coats. It resists scratches and spills effectively. Oil-based polyurethane edges ahead in extreme durability and heat resistance. For most household coffee tables, water-based polyurethane provides adequate protection with faster drying and lower odor. Choose oil-based for high-traffic tables or desired warmth.
How do I remove stains before refinishing?
Light stains often disappear during sanding. For stubborn water rings or dark stains, apply oxalic acid wood bleach per instructions, then sand. White water marks sometimes respond to rubbing with a cloth dampened in mineral spirits. Test any treatment on an inconspicuous area first. Once sanded, stain and topcoat mask remaining minor discoloration.
Can I refinish a coffee table with veneer?
Veneered tables require careful handling during sanding to avoid breaking through the thin veneer layer. Sand gently with fine-grit paper (220-grit) and avoid orbital sanders on veneered surfaces. Hand-sanding offers better control. If veneer is damaged, repair it before refinishing. Staining and topcoating veneered tables works identically to solid wood tables.
How Can You Maintain Your Refinished Coffee Table Long-Term?
Refinishing restores your table, but maintenance preserves the results. Simple practices prevent damage and extend the finish lifespan. A well-maintained refinished table looks beautiful for years without additional work. Establish routines immediately after refinishing.
Clean spills immediately to prevent water rings and stains. Use a damp cloth and mild soap; avoid harsh chemicals that damage polyurethane. Wipe dry promptly. Place coasters under glasses and mugs. Use placemats during meals to protect from heat and spills. These simple habits prevent the damage that necessitated refinishing in the first place.
Dust regularly with a soft cloth to remove particles that dull the finish. Avoid furniture polish, which builds up and clouds the surface. If the finish becomes dull, a light buff with 0000 steel wool restores sheen. For minor scratches, touch-up stain and polyurethane work well. Deeper damage requires spot refinishing or full restoration.
Keep the table away from direct sunlight, which fades finishes and dries wood. Use window treatments to filter UV rays. Maintain stable humidity levels; extreme dryness or moisture causes warping and finish separation. These preventive measures protect your refinishing investment and reduce future maintenance needs.
For additional furniture care guidance, explore our article on how to maintain sintered stone tabletops in 2026, which covers surface protection principles applicable to wood furniture as well.
Key Takeaway: Immediate spill cleanup, coaster use, regular dusting, and UV protection maintain your refinished table’s beauty for years.
Is Refinishing Your Wooden Coffee Table Worth the Effort?
Refinishing a wooden coffee table is absolutely worth the investment of time and materials. The cost savings compared to replacement are substantial—refinishing costs $50–$150 versus $300–$1,000+ for new furniture. The process restores sentimental pieces, vintage finds, or inherited tables that replacement cannot replicate. You control the final look, choosing stain colors and finishes that match your 2026 décor perfectly.
Beyond financial benefits, refinishing is environmentally responsible. Extending furniture life reduces waste and manufacturing impact. The DIY nature builds skills and confidence for future projects. Most importantly, the satisfaction of transforming a worn table into a showpiece is immeasurable. Your living room gains a beautiful, functional centerpiece that reflects your personal style and effort.
Following this guide ensures professional-quality results even for beginners. Proper preparation, quality materials, and patience yield finishes indistinguishable from professional work. Whether restoring a family heirloom or refreshing a thrift-store find, refinishing offers tremendous value. Start with your coffee table, then apply these techniques to other wooden furniture throughout your home.
Key Takeaway: Refinishing a wooden coffee table saves money, extends furniture life, and delivers professional results with proper technique and patience.





Write Your Review
No reviews yet. Be the first to share your experience!